Installation
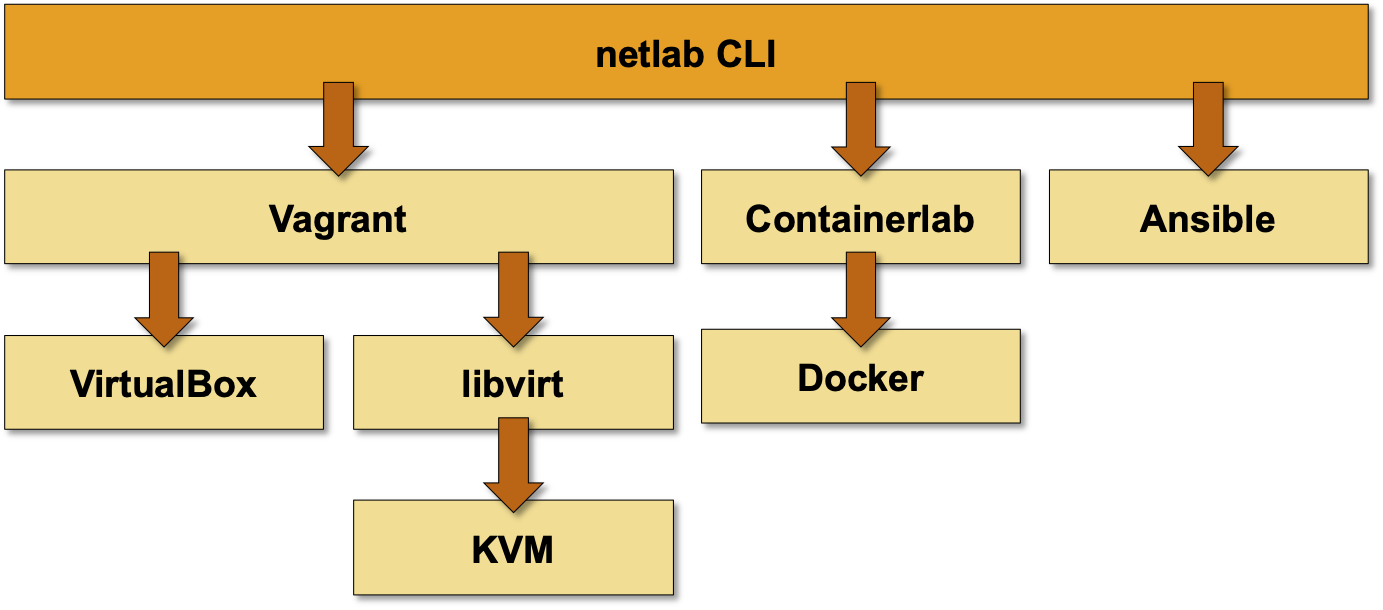
netlab is a Python3 package1 that runs on Python 3.7 or later on Windows, MacOS, or Linux. It’s a high-level abstraction and orchestration tool that relies on other tools to provide the low-level functionality:
VM/container virtualization: VirtualBox (Windows or MacOS), KVM (Linux) or Docker (Linux)
Virtualization API: libvirt (used with KVM on Linux)
VM/container orchestration: Vagrant or containerlab
Configuration deployment: Ansible 2.9.12 or later
If you already have an environment that can be used with netlab, please proceed directly to installing Python package. Otherwise, you’ll have to select the platform you want to use and create your lab environment (including netlab installation).
Selecting the Platform and Low-Level Tools
We have tested netlab with:
VirtualBox and Vagrant on MacOS. The same combination should also work on Windows 10. Ansible works on MacOS; RedHat claims it works (but is not supported) within Windows Subsystem for Linux (WSL).
libvirt/KVM and Vagrant on Ubuntu and Fedora. This combination should work on other Linux distributions.
Docker and containerlab on Ubuntu. This combination should also work on other Linux distributions.
When selecting the virtualization environment, consider the following:
VirtualBox is commonly used together with Vagrant as a laptop virtualization solution, resulting in wider variety of prepackaged boxes (Arista vEOS, Cisco Nexus 9300v, Cumulus VX, Juniper vSRX). The downsides:
Slow lab setup due to serial provisioning;
No management network (Vagrant uses a weird port NAT to access virtual machines)
VirtualBox networking is hard to integrate with the external world
Vagrant provider for libvirt supports parallel VM provisioning, resulting in much faster lab creation. An added bonus: if you decide to use Ubuntu, you can use netlab install command to install all the prerequisite software (KVM, libvirt, Vagrant, Docker, containerlab, Ansible).
Unfortunately, most vendors don’t offer virtual devices packaged as libvirt Vagrant boxes, so you’ll have to build your own boxes.
Containers provisioned with containerlab start much faster than virtual machines, but you can get only a few network devices in native container format (Arista cEOS, Nokia SR Linux, Cumulus VX).
We are focusing the majority of our platform development efforts on Linux environments using KVM/libvirt with Vagrant or Docker with containerlab. We have selected Ubuntu as the Linux distribution supported by netlab install command. The installation guide for Ubuntu is thus the most extensive one.
Creating the Lab Environment
You can set up your lab:
On Windows or MacOS using VirtualBox with Vagrant. This setup won’t be able to run network devices packaged as containers (Arista cEOS, Nokia SR Linux)
Tip
If you decide to run the network labs within a Ubuntu VM on your MacOS/Windows computer, create a new VM and use the automated software installation procedure. It’s much easier and safer than trying to install the necessary software on an existing VM.
Don’t use VirtualBox on Linux. As you won’t need a GUI to interact with the network devices we see no reason to do that when there are better alternatives (KVM+libvirt).
Building Vagrant Boxes
You might have to build Vagrant boxes for your network devices if you decide to use libvirt with KVM on a Linux system. netlab includes build recipes for the following devices:
Vendors offer more Vagrant boxes for the VirtualBox environment; some of them also offer Docker containers you can use with containerlab.
Installing Python Package
To install netlab on a system that already has the low-level tools installed, use python3 -m pip install networklab. The installation process will install all prerequisite Python packages and create the netlab command.
If you want to get the latest development code or if you want to participate in netlab development, clone the GitHub repository.
- 1
For legacy reasons, the netlab Python code resides in netsim.* modules.
- 2
Ansible 2.9 has been tested with Arista EOS, Cisco IOS, IOS-XE and NX-OS, Junos, Cumulus Linux, FRR, generic Linux devices and VyOS. Other devices might require additional Ansible collections; see caveats for further details.