Running netlab on a Linux Server
This page describes generic installation steps you have to follow to create a virtual lab environment on any Linux server. If you plan to run your labs on a Ubuntu server, follow these instructions.
Prerequisite Software Installation
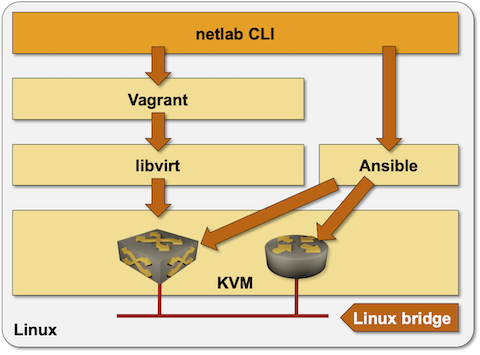
netlab is a Python package that uses KVM to run virtual machines and Docker to run containers. Virtual machines in KVM environment and the associated Linux bridges are created with Vagrant using libvirt API. Ansible is used to configure the network devices.
To build a Linux environment needed to run network devices as virtual machines or containers:
Install Python 3.7 or later
Install KVM and libvirt
Install Vagrant 2.2.14 or later
Install vagrant-libvirt plugin with
vagrant plugin install libvirt --plugin-version=0.4.1Install Ansible 2.9.1 or later and any Ansible networking dependencies (example: paramiko)
Optional: install Docker and containerlab
netlab Installation
Install Python package with sudo python3 -m pip install networklab or your preferred Python package installation procedure.
Create vagrant-libvirt Virtual Network
Vagrant libvirt provider connects management interfaces of managed VMs to vagrant-libvirt virtual network. Vagrant can figure out the device IP address based on dynamic DHCP mappings; netlab can’t. To make the Ansible inventory created by netlab create tool work, your virtual network MUST include static DHCP bindings that map management MAC addresses defined in netlab data model into expected IP addresses.
The static DHCP bindings must map MAC addresses 08:4F:A9:00:00:xx into IP addresses 192.168.121.1xx. The easiest way to create the virtual network and static DHCP mappings is to use the netsim/templates/provider/libvirt/vagrant-libvirt.xml file supplied with netlab:
If needed, delete the existing vagrant-libvirt network with
virsh net-destroy vagrant-libvirtandvirsh net-undefine vagrant-libvirtCreate the management network with
virsh net-create _path_/vagrant-libvirt.xml. The management network is also created (if needed) every time you execute netlab up.
You could also use virsh net-edit vagrant-libvirt to edit the XML definition of your existing vagrant-libvirt network – replace the exiting ip element with this XML snippet:
<ip address='192.168.121.1' netmask='255.255.255.0'>
  <dhcp>
      <range start='192.168.121.2' end='192.168.121.99'/>
      <host mac='08:4F:A9:00:00:01' ip='192.168.121.101'/>
      <host mac='08:4F:A9:00:00:02' ip='192.168.121.102'/>
      <host mac='08:4F:A9:00:00:03' ip='192.168.121.103'/>
      <host mac='08:4F:A9:00:00:04' ip='192.168.121.104'/>
      <host mac='08:4F:A9:00:00:05' ip='192.168.121.105'/>
      <host mac='08:4F:A9:00:00:06' ip='192.168.121.106'/>
      <host mac='08:4F:A9:00:00:07' ip='192.168.121.107'/>
      <host mac='08:4F:A9:00:00:08' ip='192.168.121.108'/>
      <host mac='08:4F:A9:00:00:09' ip='192.168.121.109'/>
      <host mac='08:4F:A9:00:00:0A' ip='192.168.121.110'/>
      <host mac='08:4F:A9:00:00:0B' ip='192.168.121.111'/>
      <host mac='08:4F:A9:00:00:0C' ip='192.168.121.112'/>
      <host mac='08:4F:A9:00:00:0D' ip='192.168.121.113'/>
      <host mac='08:4F:A9:00:00:0E' ip='192.168.121.114'/>
      <host mac='08:4F:A9:00:00:0F' ip='192.168.121.115'/>
      <host mac='08:4F:A9:00:00:10' ip='192.168.121.116'/>
      <host mac='08:4F:A9:00:00:11' ip='192.168.121.117'/>
      <host mac='08:4F:A9:00:00:12' ip='192.168.121.118'/>
      <host mac='08:4F:A9:00:00:13' ip='192.168.121.119'/>
      <host mac='08:4F:A9:00:00:14' ip='192.168.121.120'/>
      <host mac='08:4F:A9:00:00:15' ip='192.168.121.121'/>
      <host mac='08:4F:A9:00:00:16' ip='192.168.121.122'/>
      <host mac='08:4F:A9:00:00:17' ip='192.168.121.123'/>
      <host mac='08:4F:A9:00:00:18' ip='192.168.121.124'/>
      <host mac='08:4F:A9:00:00:01' ip='192.168.121.101'/>
	</dhcp>
</ip>
For more details, see Using Libvirt Provider with Vagrant by Brad Searle.
Testing the Installation
The easiest way to test your installation is to use netlab test command. If you prefer to do step-by-step tests, you might find this recipe useful:
Create an empty directory and
topology.ymlfile with the following contents within that directory:
---
defaults:
  device: cumulus

nodes: [ s1, s2, s3 ]
links: [ s1-s2, s2-s3, s1-s2-s3 ]
Create Vagrantfile with
netlab createcommandExecute
vagrant upto spin up three Cumulus VX virtual machinesConnect to the Cumulus VX devices with
vagrant sshDestroy the lab with
vagrant destroy -f