Virtualbox-Based Lab on Windows or MacOS
Virtualbox-based Vagrant lab is the only option if you want to run netlab directly on Windows or MacOS (you could also run them within a Ubuntu VM):
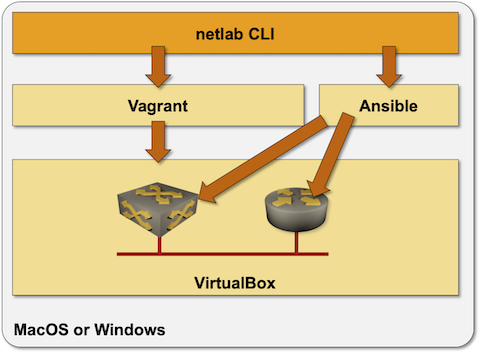
netlab commands will create Ansible inventory and Vagrant configuration
Vagrant will create virtual networks within VirtualBox environment and start network devices as virtual machines within VirtualBox
Ansible will connect to the network devices and configure them
The environment is pretty easy to set up:
Install Virtualbox (might require fiddling with BIOS setup on Ubuntu bare-metal installations)
Install netlab Python package with
pip3 install networklabInstall Ansible1 and device-specific requirements.
Test the installation with netlab test virtualbox command
Creating a New Lab
To create a new lab:
Create lab topology file in an empty directory. Use
provider: virtualboxin lab topology to select the virtualbox virtualization provider.Execute netlab up
Testing the Installation
The easiest way to test your installation is to use netlab test command. If you prefer to do step-by-step tests, or if you don’t want to install Ansible, you might find this recipe useful:
Create an empty directory and
topology.ymlfile with the following contents within that directory:
---
defaults:
  device: cumulus

nodes: [ s1, s2, s3 ]
links: [ s1-s2, s2-s3, s1-s2-s3 ]
Execute
netlab up --no-configto create configuration files and start the lab without configuring network devices (that step would require Ansible)Connect to the Cumulus VX devices with
vagrant sshDestroy the lab with
netlab down
Creating Vagrant Boxes
Vagrant relies on boxes (prepackaged VM images). The following Vagrant boxes are automatically downloaded from Vagrant Cloud when you’re using them for the first time in your lab topology:
| Virtual network device | Vagrant box name |
|---|---|
| Cumulus VX | CumulusCommunity/cumulus-vx:4.4.0 |
| Cumulus VX 5.0 (NVUE) | CumulusCommunity/cumulus-vx:5.0.1 |
| Generic Linux | generic/ubuntu2004 |
You’ll have to download Arista vEOS and Nexus 9300v images from the vendor web site (requires registration) and install them with vagrant box add filename –name boxname command. You’ll find build recipes for other network devices on codingpackets.com.
You have to use the following box names when installing or building the Vagrant boxes:
| Virtual network device | Vagrant box name |
|---|---|
| Arista vEOS | arista/veos |
| Cisco IOSv | cisco/iosv |
| Cisco CSR 1000v | cisco/csr1000v |
| Cisco Nexus 9300v | cisco/nexus9300v |
| Juniper vSRX 3.0 | juniper/vsrx3 |
Notes:
Arista rarely ships the latest software version as a Vagrant box. You’ll usually have to build your own box if you want to have an up-to-date EOS version.
Vagrantfile created by netlab create or netlab up sets up port forwarding for SSH (22), HTTP (80) and NETCONF (830), but the corresponding Ansible inventory contains only ansible_port (SSH). You could edit the final inventory by hand, add extra file to
host_vars, or fix netlab code. Should you decide to do the latter, please contact us in advance to discuss the necessary data structures.If you want to add other network devices, build your own Vagrant boxes and modify system topology-defaults.yml file or user defaults (see adding new virtualization provider for an existing device for more details).
- 1
Running Ansible on Windows is not supported, but supposedly it runs just fine under WSL.